Chicken of the Woods: Forest Flavor at Home
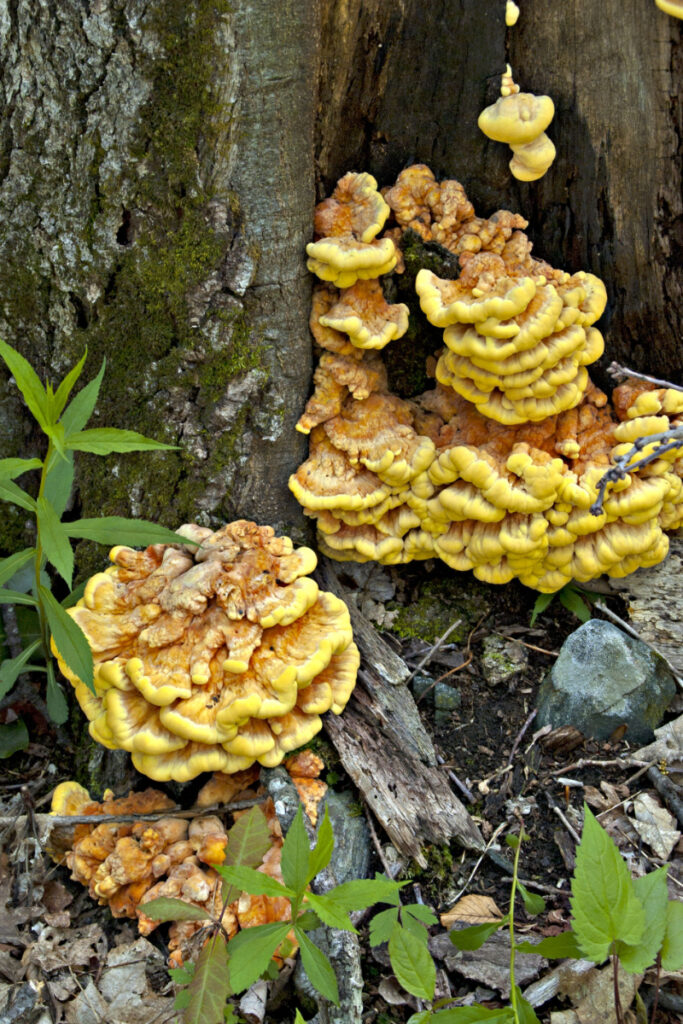
It was a crisp autumn day when I first stumbled upon a vibrant patch of chicken of the woods mushrooms during a leisurely hike in the woods. The bright orange and yellow hues instantly caught my eye, and I couldn’t help but feel intrigued by their unique appearance.
Little did I know that this chance encounter would spark a newfound passion for cultivating these fascinating fungi at home.
After doing some research on chicken of the woods (Laetiporus sulphureus), I discovered that not only are they visually stunning, but they also have a delicious taste and texture that closely resembles—you guessed it—chicken!
This, combined with their nutritional benefits and versatility in culinary applications, made me eager to try my hand at growing them myself.
In this account of my personal journey, I’ll share the steps I took to successfully cultivate chicken of the woods mushrooms, from finding the perfect spot and gathering resources to mastering the art of inoculation and tending to my mushroom garden.
My hope is that my experience will inspire others to embark on their own mushroom-growing adventures and reap the rewards that come with nurturing these delightful fungi.
My Personal Journey to Growing Chicken of the Woods Mushrooms
Choosing the Ideal Environment
Before diving into the cultivation process, it was crucial to find the perfect spot for my chicken of the woods mushrooms to grow and thrive.
I knew from my research that these fungi have a strong preference for hardwoods, particularly oak, but they can also grow on other hardwood species like beech, maple, and cherry. With this in mind, I set out to find a suitable location that provided access to the right type of wood.
After scouting my property, I found a shaded area with several fallen oak logs, which seemed like the ideal environment for my mushroom garden. This spot not only offered the preferred wood type, but it also provided ample shade and protection from direct sunlight, which is essential for maintaining proper moisture levels during the growth process.
The area was also well-drained, ensuring that the logs wouldn’t become waterlogged, as excess moisture can lead to rot and other issues.
In addition to selecting the right wood, I also learned that chicken of the woods mushrooms prefer logs with a diameter of at least 4 to 6 inches and a length of around 3 to 4 feet.
This size ensures that the log will have enough nutrients to support the fungus throughout its life cycle. So, I carefully chose a few logs that met these criteria and prepared them for inoculation.
To further optimize the growing conditions, I considered the natural orientation of the logs when they were still part of a living tree.
Chicken of the woods mushrooms typically grow on the sides or at the base of trees, so I made sure to position the logs horizontally on the ground, mimicking their natural habitat.
It’s also worth mentioning that I decided to start my project in the spring, as this is the best time to inoculate logs for chicken of the woods cultivation. The warmer temperatures and increased humidity promote faster mycelium growth, resulting in a higher success rate.
Assembling the Necessary Supplies and Preparing the Logs
Once I had chosen the ideal location and logs for my mushroom garden, it was time to gather the resources required for inoculation and prepare the logs for this crucial process. The first and most important item on my list was high-quality spawn or plugs.
These are essentially the “seeds” that will introduce the chicken of the woods mycelium to the logs, allowing the fungi to grow and colonize their new environment.
I searched online for a reputable supplier and purchased chicken of the woods sawdust spawn, which is a mixture of sawdust and mycelium. Alternatively, you can use plug spawn, which are small wooden dowels that have been colonized by the mushroom mycelium.
Both options work well, but I found sawdust spawn to be more readily available and easier to handle.
With my spawn in hand, I also gathered the following supplies to prepare the logs for inoculation:
- A power drill with a 5/16-inch bit (or the appropriate size for your chosen spawn)
- A hammer or mallet
- Wax (such as beeswax or cheese wax) for sealing the inoculation holes
- A small brush or cloth for applying the wax
- A clean cloth or paper towel for wiping the drill bit between uses
Before starting the inoculation process, I allowed the logs to age for two to three weeks after cutting them.
This step is essential because it allows the tree’s natural defense mechanisms to dissipate, making it easier for the chicken of the woods mycelium to colonize the wood.
However, it’s important not to wait too long, as other fungi or contaminants may start to colonize the logs if given the opportunity.
After the aging period, I brushed off any loose bark or debris from the logs using a stiff-bristled brush. This helped ensure a clean surface for the spawn to adhere to and minimized the risk of contamination.
IV. Mastering the Inoculation Technique and Caring for the Logs
With my logs and supplies ready, I was eager to begin inoculating them with the chicken of the woods spawn. Here’s the step-by-step process I followed to ensure successful colonization:
Drilling holes
I drilled holes into the logs, spaced approximately 6 inches apart in a diamond pattern, ensuring that each row was offset from the one above and below it. The holes were about 1 inch deep, just enough to accommodate the sawdust spawn.
Filling the holes with spawn
Using a small spoon, I carefully filled each hole with the sawdust spawn, making sure it was packed tightly. If you’re using plug spawn, simply insert the plugs into the holes using your fingers or a pair of pliers, then gently tap them in place with a hammer or mallet.
Sealing the holes
To protect the spawn from drying out and to keep pests at bay, I sealed each hole with melted wax. Using a small brush, I applied a layer of wax over the spawn-filled holes, ensuring a complete seal. Be sure to work quickly, as the wax will harden as it cools.
Stacking the logs
Once all the holes were inoculated and sealed, I stacked the logs in a crisscross pattern, allowing for air circulation and even exposure to moisture. This log cabin-style stack also provides some protection from direct sunlight and helps maintain adequate humidity levels.
During the inoculation process, I made sure to keep my tools clean and wiped the drill bit with a cloth between uses to minimize the risk of contamination.
With the inoculation complete, it was time to exercise patience and allow the mycelium to colonize the logs. This process can take anywhere from 6 months to 2 years, depending on factors such as log size, temperature, and moisture. In the meantime, I focused on caring for my mushroom garden and ensuring optimal growing conditions.
Maintaining proper moisture levels
One of the critical factors in successful mushroom cultivation is maintaining adequate moisture levels. I regularly checked the logs to ensure they were not drying out, especially during hot or dry weather. To maintain moisture, I occasionally soaked the logs in water for several hours or used a hose to mist them lightly.
Protecting the logs from pests and contaminants
While the wax seals on the inoculation holes help protect the spawn from pests, it’s essential to keep an eye out for any signs of infestation or contamination. If I noticed any suspicious growths or insects around the logs, I took immediate action to address the issue, such as removing the affected area or applying an organic pesticide.
Monitoring progress
As the mycelium colonized the logs, I looked for signs of growth, such as the appearance of white, thread-like strands (mycelium) on the log’s surface or between the bark and wood. This indicated that the chicken of the woods mycelium was successfully colonizing the log and progressing towards fruiting.
Harvesting and Enjoying the Fruits of My Labor
After months of patiently waiting and diligently caring for my mushroom garden, I was finally rewarded with an abundant crop of chicken of the woods mushrooms.
As the mycelium colonized the logs, the first signs of fruiting began to appear in the form of small, brightly colored growths on the log surfaces.
Over time, these growths developed into mature, fan-shaped clusters, indicating that they were ready for harvest.
Here’s how I approached the harvesting process and enjoyed the fruits of my labor:
Timing the harvest
Chicken of the woods mushrooms are best harvested when young and tender, as they can become tough and fibrous as they age. I looked for specimens with bright colors (typically vibrant orange or yellow) and a moist, slightly spongy texture. The edges of the mushroom should be soft and pliable, not dry or brittle.
Harvesting the mushrooms
To harvest the mushrooms, I used a sharp knife to carefully cut them off at the base, leaving a small portion of the fungus attached to the log. This method helps preserve the integrity of the mycelium, allowing for future fruiting.
Cleaning and storage
After harvesting, I gently brushed off any dirt or debris from the mushrooms using a soft brush or damp cloth. It’s essential not to wash chicken of the woods mushrooms with water, as they can quickly become waterlogged and lose their flavor and texture. To store the mushrooms, I placed them in a paper bag or wrapped them in a damp cloth and kept them in the refrigerator for up to a week.
Preparing and cooking
Chicken of the woods mushrooms have a unique flavor and texture that lends itself well to various culinary applications. They can be sautéed, roasted, or even pickled, and their meaty texture makes them an excellent substitute for chicken in many dishes. Some of my favorite ways to enjoy these mushrooms include:
- Sautéing them in butter or olive oil with garlic and herbs, then serving them as a side dish or topping for pasta or risotto.
- Roasting them in the oven with a drizzle of olive oil, salt, and pepper, then using them as a filling for sandwiches, wraps, or tacos.
- Incorporating them into soups, stews, or casseroles for added depth of flavor and texture.
Conclusion
Cultivating chicken of the woods mushrooms at home is a rewarding and educational experience that allows you to connect with nature and enjoy the unique flavors and textures of homegrown fungi.
By carefully selecting the ideal environment, assembling the necessary supplies, mastering the inoculation technique, and diligently caring for your mushroom garden, you can successfully grow these fascinating fungi and reap the benefits of your hard work.
Throughout the process, you may encounter challenges and setbacks, but by learning from these experiences and adapting your approach, you can continue to refine your techniques and improve your success rate.
Cultivating chicken of the woods mushrooms not only provides a delicious and versatile culinary ingredient but also fosters a deeper appreciation for the amazing world of fungi and their essential role in our ecosystem.
So, gather your supplies, roll up your sleeves, and embark on this exciting journey into the world of mushroom cultivation. With patience, dedication, and a little bit of luck, you’ll soon be enjoying the fruits of your labor in the form of delectable, homegrown chicken of the woods mushrooms.