Master the Art of Growing Broccolini Today!
Ever since I first tasted the delightful crunch and subtle flavor of broccolini, I knew I had to learn how to grow this nutritious vegetable in my own garden.
As a cross between broccoli and Chinese kale, broccolini has quickly become one of my favorite vegetables to grow and enjoy in various dishes. Not only does it taste amazing, but it’s also packed with vitamins and minerals that are essential for maintaining good health.
In this guide, I’ll share with you my personal journey of mastering the art of growing broccolini, from selecting the right variety to savoring the fruits of my labor.
I hope that by sharing my experience, you’ll be inspired to embark on your own broccolini-growing adventure and discover the joy and satisfaction that comes with nurturing this wonderful vegetable.
Mastering the Art of Growing Broccolini Today!
Choosing the Right Variety
When I first started exploring the world of broccolini, I was surprised to find out that there are several different varieties available. Each variety has its own unique characteristics, such as varying growth rates, flavors, and appearances. After trying out a few different types, I found the variety that worked best for me and my garden’s conditions.
Here are some popular broccolini varieties that I have experimented with:
‘Apollo’ Broccolini
This is a hybrid variety that produces tender, sweet stalks with small florets. It’s an early-maturing variety, which means you can expect to harvest it sooner than other types.
‘Aspabroc’ (also known as ‘Broccolette’)
This variety is often referred to as the original broccolini and is known for its mild, sweet taste and thin, tender stems. It’s also relatively easy to grow, making it a great choice for beginners.
‘Happy Rich’
This variety is prized for its abundant yields of large, tender florets and thick, succulent stems. It’s a bit more heat-tolerant than other broccolini varieties, making it a good choice for those in warmer climates.
‘Santee’
This variety is known for its attractive appearance, with long, slender stems topped with small, tight florets. It has a slightly nutty flavor and is quite cold-hardy, making it suitable for cooler climates.
After experimenting with these different varieties, I settled on ‘Aspabroc’ as my favorite for its ease of growth, consistent yields, and delicious taste. However, you might find that another variety suits your tastes and growing conditions better. Don’t be afraid to try different types until you find the perfect one for you!
Finding the Ideal Location
The next step in my broccolini-growing journey was selecting the perfect spot in my garden to plant this wonderful vegetable. Broccolini thrives in full sun, so I knew that I needed to find a location that received at least six hours of sunlight per day. Additionally, broccolini prefers well-draining soil, so I also considered the drainage conditions of the potential planting sites.
After evaluating various spots in my garden, I chose a location that met these criteria and also had enough space for the plants to grow without overcrowding. Broccolini plants can grow up to 2-3 feet tall and require about 18-24 inches of spacing between plants to ensure adequate airflow and prevent diseases. Make sure you factor in this space requirement when choosing your planting site.
If you don’t have a garden or are short on space, don’t worry! Broccolini can also be grown successfully in containers. Choose a container that is at least 12 inches deep and has drainage holes to prevent waterlogging. Place your container in a sunny spot, and you’re good to go!
Preparing the Soil
Once I had chosen the ideal location for my broccolini plants, it was time to prepare the soil. Broccolini prefers fertile, well-draining soil with a pH level between 6.0 and 7.0. To achieve these conditions, I followed these steps:
Testing the Soil
Before making any amendments, I tested the pH level of my garden soil using a soil test kit. This helped me determine what adjustments were needed to create the perfect environment for my broccolini plants.
Amending the Soil
Based on the results of my soil test, I added organic matter (such as compost or well-rotted manure) to improve fertility and drainage. If your soil is too acidic (pH below 6.0), you can add lime to raise the pH level. Conversely, if your soil is too alkaline (pH above 7.0), adding sulfur or peat moss can help lower the pH.
Tilling and Leveling
After incorporating the necessary amendments, I tilled the soil to a depth of about 12 inches, breaking up any large clumps and mixing in the added organic matter. This step helps create a loose, well-aerated soil that allows broccolini roots to grow easily. Finally, I leveled the soil surface to ensure even planting and proper drainage.
Fertilizing
A week before planting, I applied a balanced, slow-release fertilizer to provide essential nutrients for my broccolini plants. Make sure to follow the package instructions for the correct application rate, and mix the fertilizer into the top few inches of soil.
Planting and Caring for Seeds
With the ideal location selected and the soil prepared, it was time to sow my broccolini seeds. Planting broccolini is relatively straightforward, but I found that following these guidelines helped ensure a successful crop:
Timing
Broccolini is a cool-season vegetable, so I planted my seeds in early spring, about 4-6 weeks before the average last frost date in my area. For a fall harvest, I sowed seeds in late summer, about 85-100 days before the average first frost date.
Sowing
I created shallow furrows about ¼ inch deep and spaced them about 18-24 inches apart to allow for proper airflow between plants. I then dropped the seeds into the furrows, spacing them about 4 inches apart. After placing the seeds, I gently covered them with soil and watered the area thoroughly.
Germination
Broccolini seeds typically germinate within 7-10 days, provided the soil temperature is between 45-85°F. To help maintain consistent moisture levels during germination, I kept the soil evenly moist but not soggy.
Thinning
Once my seedlings were about 2-3 inches tall and had developed their first true leaves, I thinned them to a final spacing of 18-24 inches apart. This process ensures that each plant has enough room to grow and reduces competition for nutrients, water, and sunlight.
Tending to Growing Plants
After planting and nurturing my broccolini seeds, it was time to care for the growing plants. Proper care is essential for a healthy, bountiful harvest. Here’s how I tended to my broccolini plants:
Watering
Broccolini requires consistent moisture to grow well. I made sure to water my plants deeply, providing about 1-1.5 inches of water per week. It’s essential to water the plants at the soil level to avoid wetting the foliage, which can encourage diseases. Using a soaker hose or drip irrigation system is a great way to provide consistent moisture without wetting the leaves.
Feeding
Broccolini is a heavy feeder and benefits from regular applications of a balanced, slow-release fertilizer. I applied additional fertilizer every 4-6 weeks throughout the growing season, following the package instructions for the correct application rate.
Mulching
To help conserve moisture, regulate soil temperature, and suppress weeds, I applied a 2-3 inch layer of organic mulch (such as straw, grass clippings, or shredded leaves) around my broccolini plants, making sure to keep the mulch a few inches away from the plant stems to prevent rot.
Pest Control
Broccolini can be susceptible to pests like aphids, cabbage worms, and flea beetles. To keep these pests at bay, I regularly inspected my plants for signs of infestation and used organic pest control methods, such as introducing beneficial insects (like ladybugs), using insecticidal soap, or applying diatomaceous earth around the base of the plants.
Knowing When to Harvest
As my broccolini plants grew and matured, I eagerly anticipated the moment when I could finally harvest and enjoy the fruits of my labor. Knowing when to harvest broccolini is crucial for ensuring the best flavor and texture. Here’s how I determined the right time to harvest my broccolini:
Timing
Broccolini typically takes about 50-60 days to mature from seed, or around 30-40 days from transplanting. While this provided me with a general timeframe, I also relied on visual cues to determine the exact moment to harvest.
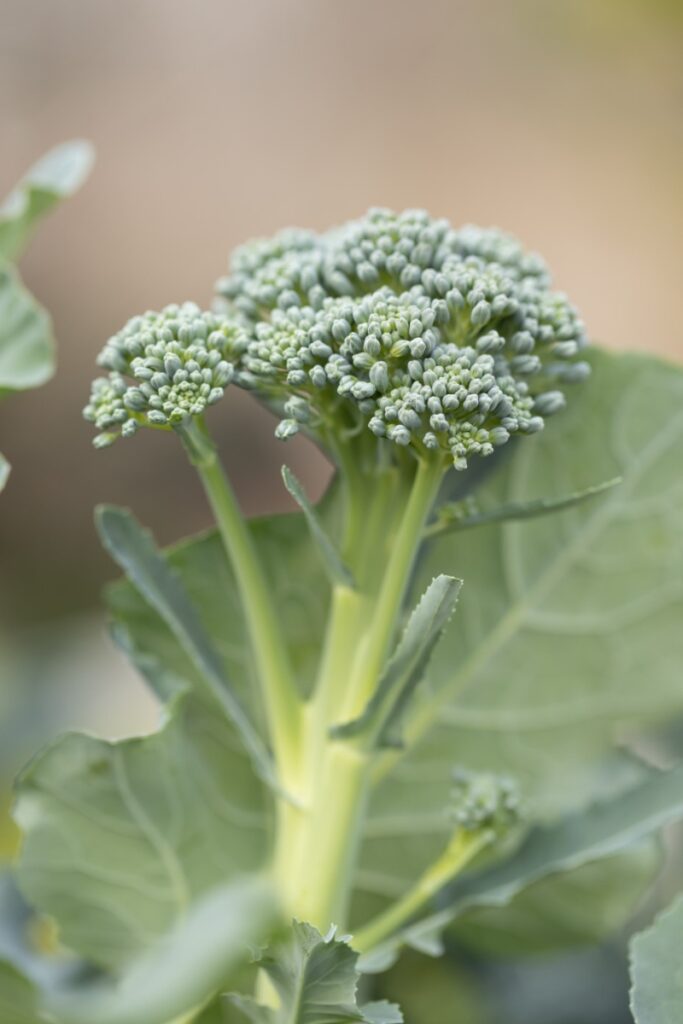
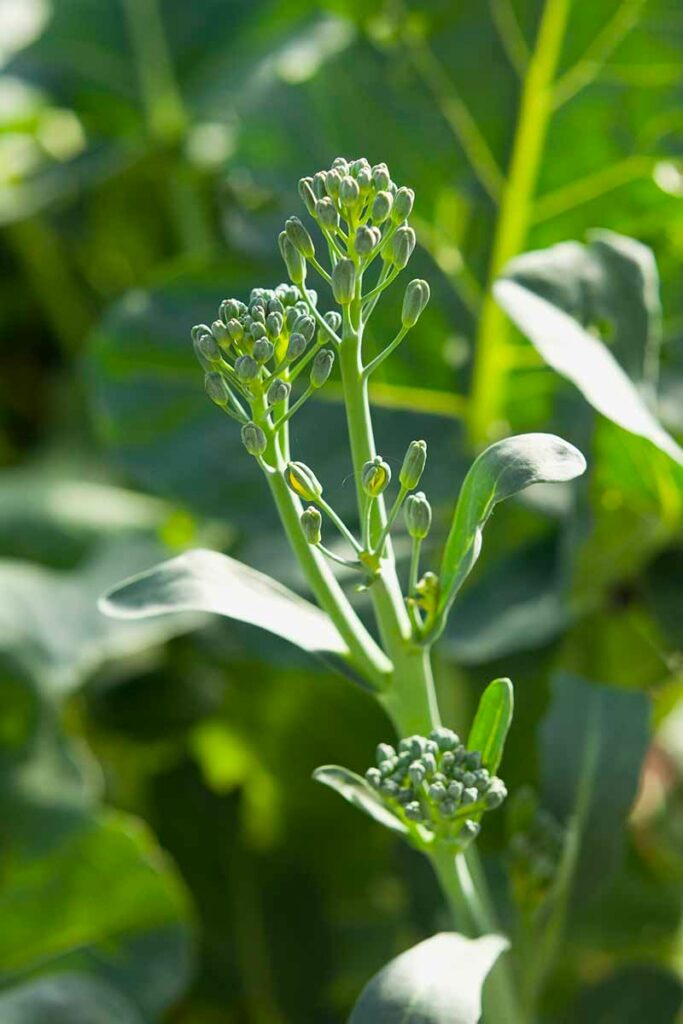
Visual Cues
The ideal time to harvest broccolini is when the central head reaches about 4-6 inches in length and the buds are still tightly closed. If the buds begin to open and show yellow flowers, the broccolini may become tough and bitter.
Regular Harvesting
One of the great things about broccolini is that it continues to produce side shoots after the main head has been harvested. By regularly picking these side shoots when they’re about the same size as the central head, I was able to extend my harvest and enjoy fresh broccolini for several weeks.
Storing and Savoring Your Broccolini
After successfully harvesting my broccolini, it was time to store and savor this delicious, nutritious vegetable. Proper storage is essential for maintaining freshness and flavor. Here’s how I stored my broccolini harvest:
- Refrigeration: To keep my broccolini fresh, I placed it unwashed in a loosely sealed plastic bag and stored it in the crisper drawer of my refrigerator. This method allowed me to keep my broccolini fresh for up to two weeks.
- Freezing: For longer-term storage, I blanched my broccolini by briefly boiling it and then immediately plunging it into ice water to stop the cooking process. After draining and patting the broccolini dry, I placed it in airtight freezer bags and stored it in my freezer for up to six months.
With my broccolini harvest safely stored, I was ready to enjoy this versatile vegetable in a variety of dishes. Some of my favorite ways to savor broccolini include:
- Lightly steamed and served with a squeeze of lemon and a sprinkle of salt
- Sautéed with garlic and crushed red pepper flakes for a spicy side dish
- Roasted in the oven with olive oil, salt, and pepper for a caramelized treat
- Stir-fried with other vegetables and protein in a flavorful sauce
Conclusion
In conclusion, my journey to mastering the art of growing broccolini has been a rewarding and fulfilling experience. From selecting the perfect variety and location to tending to my plants and savoring the delicious harvest, each step has taught me valuable lessons about patience, dedication, and the joy of nurturing something from seed to plate.
I hope that by sharing my personal broccolini-growing adventure, I have inspired you to embark on your own journey and experience the satisfaction that comes from cultivating this versatile, nutritious vegetable. With a little care and attention, you too can enjoy the delightful taste and health benefits of homegrown broccolini.
So, gather your seeds, prepare your soil, and get ready to discover the joys of growing broccolini today!